Hints and tips


Does it annoy you when you’re scrolling through pages of assets to find the one you want? Would you like to find a quicker way to access your workflows? Or maybe you want to change the way you view the asset store? Then you’ve come to the right place!

There’s so much you can do with bethebrand, and we’d like to share this information with you, to help enhance your use of your system.
Whether it’s a keyboard shortcut, identifying your favourite assets, or creating distribution groups, our hints and tips aim to bring you time saving efficiencies and maximise your use of the system.

This Hints & Tips page has been designed to provide you with snippets of information, and can be searched on e.g. if you're looking for information on the asset store, click on the 'asset store' tag.

Keep an eye out for new hints and tips as they get added.

If you'd like to find out more about what Be the Brand are up to, follow us on LinkedIn

The 'Tasks in deliverables with no assigned users' report allows Managers and/or Superusers to quickly identify where no user has been assigned to a current task, helping to prevent any unnecessary delay in the task being actioned.

The 'Subscription notifications and acknowledgements report' can be used to see the history of all asset subscription notifications, and whether the users have acknowledged receipt of them or not.

The 'Overdue Tasks' report can be used to identify where there are potentially bottlenecks in the current workload with different users/business areas, so that Managers & Team Leaders can prioritise work.

The 'Subscriptions by User' report shows you where users have requested to be alerted whenever particular assets are updated. It gives an indication of which assets are seen as important, and being regularly used by different parts of the business - e.g. Sales, Operations teams, etc.

Asset Usage reports can be helpful to understand how the assets, content & images in the Asset Store are being used. It shows you how frequently assets are viewed, downloaded & distributed, so you can potentially provide more (or less) content/options for certain areas/topics depending on what is proving popular.

SeeDynamic gives you the option to either

  • always show the readability score for documents submitted, OR
  • only show the readability score if the document is above the selected threshold - if no insight is generated, it indicates the document is fine from a readability aspect (based on the threshold set).

Keep your SeeDynamic insight guidance short and to the point, so it doesn't take up too much space on the screen when it's generated, but users have enough information to know what it is that they need to do.

SeeDynamic provides 2 readability standards to choose from:

  • Automated Readability Index (ARI)
  • Flesch Reading Ease

You can either set one rule for all content or have content specific rules e.g. an application form could have a different rule / threshold / standard than that of a technical guide.

Many clients are using the readability functionality to help support their Consumer Duty requirements.

Use SeeDynamic readability functionality to ensure the readability scores of your assets are suitable for their intended audience(s).

Convert a webpage url into a pdf, directly into your Workflow, by using www.snapshot. Adding add more than one url to snapshot will result in a multi-page output.

Generate a post check-in workflow to automatically distribute the latest asset to relevant individuals / areas e.g. to salesforce, etc. (Please note, this is a configurable option - please speak to BTB if you'd like more information.)

Post check-in, automatically send an asset to one or more teams or channels for them to fulfil their responsibility – e.g. upload the asset to the website, update social content, etc. (Please note, this is a configurable option - please speak to BTB if you'd like more information.)

Rather than uploading a series of webpage screen shots for review, create a more realistic view of the customer experience by uploading a recording of you moving through the webpages. Reviewers can leave their comments in Markup as normal. (Please note, you will need to have access to a video recording tool for this e.g. Camtasia, SnagIt.)

Save time by checking out your assets directly from the Asset Lifecyle area. If the asset isn’t currently being worked on, you’ll have a link to ‘Create’ a Workflow in the column on the far right. You can check the chosen asset out, directly into the required Campaign / Project.

Ensure consistency, and save time, by importing Verification into your current Workflow, from a previous Workflow. Select Files > Import > Workflow number

Subscribe to the 'Tasks in Deliverables with No Assigned Users' report as a regular way of monitoring / identifying where current tasks are unassigned / won't progress. These tasks will also sit at the top of your Notifications area, in gold, prompting you to take action.

Request and obtain a quote from your printer, designer, or other supplier - at any time - without the need to check an asset out. (Please note, this is a configurable option - please speak to BTB if you'd like more information.)

Use the Asset Lifecycle section of the Dashboard to quickly see, and Download, a status summary of the assets you own.

Expand / collapse your online Report to fit your screen size requirements.

Re-order (sort) the content your online Report by clicking on the relevant column header e.g. highest - lowest or vice versa.

For a quicker download, filter your Reports online before you download.

Restrict who can / can't see or access Workflows, by managing Access Types.

If you need to create a new asset that is very similar to an existing one in the Asset Store, save yourself time in its creation, and use the 'Copy an item' function in your deliverable (you will select the Copy option instead of checking an asset out / creating a new item). The asset being copied remains unchanged, however, the Asset > View > History area will show the link between the existing asset and the new/copied asset - just like the link between Parent/Child asset. (Please note, this is a configurable option - please speak to BTB if you'd like more information.)

You can Check In your assets with a Version Date / Use From Date in the future e.g. a series of assets are needed for a product launch on x date but can't be in the public domain before that date. The asset(s) will sit in the Pending section of the Asset Store until that date is reached - only those with the relevant permissions can see assets in the Pending area.

When you don't want any more Workflows to be added to your Campaign / Project, it can be locked by a Superuser. This is done by clicking on the padlock button next to ‘Add Deliverable’.

Superusers / Systems Guardians can set up reviewer groupings as Favourites for all users to have access to (these are classed as company-wide Favourites).

Increase the privacy of your Workflow for sensitive material by using the Access function (this appears under the Users area within a Workflow). This can be set by the Workflow owner or project admin, and restricts access to only users of the Workflow. Example of use: Several teams could be working on the same campaign but not see each others work.

When multi-editing asset metadata in Grid Edit view, have a look at the Grid Edit Help area for some keyboard shortcuts.

Use multi-asset workflows when

  • there are groups / batches of assets that are related or will be used together
  • the assets need to be signed off by the same areas / approvers
  • the assets all need to be approved within the same timescales

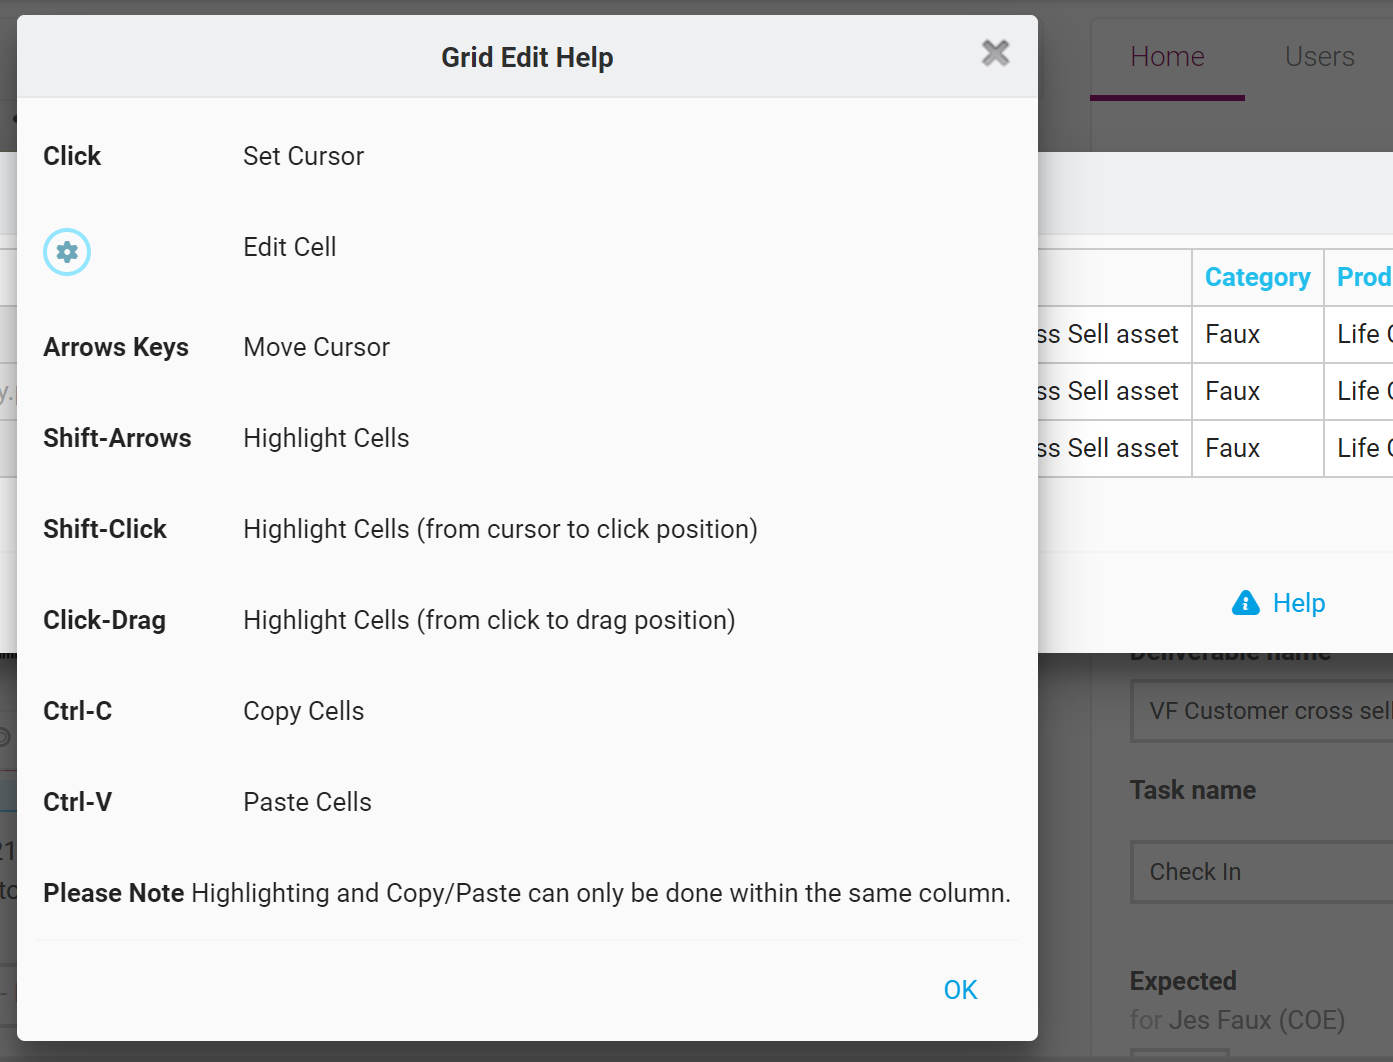
You can also multi-edit asset Metadata by using Grid Edit – this displays the Metadata of each selected asset in a grid / table format. Select the required assets and click on the Grid Edit button (to the right-hand side of the assets) - in this view, you can mass copy/paste between cells (like in Excel). Check you haven't missed any mandatory fields by using the "validate" functionality.

When working with multi-assets in your workflow, use the multi-edit function to update the asset Metadata on them. Select the required assets and click on the Multi Edit button (to the right-hand side of the assets). Just remember that whatever you enter on the asset Metadata screen will transfer to all selected assets.

In a multi-asset workflow, when rejecting or approving subject to comments, make sure you deselect any assets that don't require to be changed.

If one asset in a multi-asset workflow has caused the task to be rejected, ensure you flag this in the comments box so the person managing the workflow is clear on what still needs to be addressed.

If you find that one asset in a multi-asset workflow is holding it up, remove the asset. The asset can be reviewed in a separate workflow, and its history from the multi-asset workflow copied over to the new one (cross-reference the multi-asset workflow this came from, as best practice).

When performing a multi-asset workflow, click on Save Draft before submitting, to ensure all work has been saved.

Keep up to date with the latest news from bethebrand experience by following us on LinkedIn!

Our next development is very exciting indeed…!

Helping teams utilise cutting edge tech to deliver content with unparalleled brand and regulatory alignment. Driving further automation into content creation. Interested in knowing more? Have a look at SeeDynamic!

Before uploading an Excel spreadsheet to Mark Up, select the area you want to preview so that it displays correctly. This link shows you how to do this.

Download a document with Mark up comments to allow you to review all comments made on that version, offline - this is done from within the Mark up functionality.

Capture and report on reasons each time a User Archives an asset or cancels a workflow, to identify trends or training requirements. (Please note, this is a configurable option - speak to BTB if you'd like more information.)

Show / hide columns in your Reports to show only what you need - changes will be remembered until your cache and cookies are cleared.

Enable users without access to the reporting suite to have visibility of relevant Reports by adding them to a Subscription list.

Use the Subscribe functionality to receive your selected Reports on a regular basis.

Filter your Reports on-screen to show only the information you need, by using the Search function e.g. if you only want the Report to show assets that have a status of Red. Do this before you Subscribe to save you having to filter each time.

If you Ignore a comment, or disagree with what’s been said, use the reply feature to ‘@’ the person who provided the comment that you are ignoring (best practice). This then notifies them via email, so any challenges can be addressed as quickly as possible, helping to prevent any delays in Final Approval.

Don't be distracted by lots of comments on your page - configure how you view comments, so that it works for you;

  • Click on 'Show Mark up' to display comments, or to view the page without comments.
  • Expand comment headers to see the detail of comments left / collapse them to hide the detail.
  • Select 'With Comments' format to show comments in a list down the right-hand side of the file.

If adding a comment that has a supporting document / Verification, upload this with your feedback / comment or into the Mark up file – this makes it easier for reviewers to cross-check, and can help speed up the review process.

Subscribe to assets to receive alerts when the asset is updated or its status changes.

If you need to get a message out to all Users, or a selected group of Users, create a Banner Notification on the system.

Set up Teams, to allow work to be reallocated from a mailbox, or reassigned or shared between a group of Users. Users can sit in more than one Team, and will be able to see all workflows being progressed by members of their Team(s).

If you know you need to Archive an asset(s) at a date in the future, you don't have to wait until that date to action it - select to Archive the asset and tick 'Archive on a particular date'.

Use the Progress area to see the status of all of your own / your team’s workflows, at macro level.

Add an Out of Office marker from the Notifications area, so that systems users can see when you’re not available to pick up work.

Add comments into a workflow from the Notifications area – useful if you’re allocating work, as you can comment without having to access the workflow!

Access workflows directly from Notifications or emails - just click on the link!

See and manage your team’s tasks from the Notifications section - click on Team. Reprioritise work accordingly by using the drag and drop functionality.

Tasks can be reassigned directly from the Notifications section of the Dashboard. In 'To Do > Team' view, use the Reassign functionality to move work, or share a task by selecting 'Add Users'.

Set your email preferences from your user profile i.e. opt in / out of 'Daily task summary' and task to action emails. Opting out of these does not impact other emails you'll receive from the system e.g. distributions, subscriptions, direct messages, etc.

Use the @ function (e.g. @JoeBlogs) in Mark up or generally anywhere you can post comments, to ensure that the person the feedback is for is directly notified via the system and email.

If you collapse the yellow help text box, this will be remembered in cookie settings.

Select multiple assets by holding down CTRL and clicking your mouse on the required assets. Use this to Archive, Export, Distribute or Download multiple assets at the same time.

Auto-archive single use assets from the Asset Store by selecting the One Off Item toggle in the asset Metadata.

You can share assets with other users by using the Distribute option shown against each asset.

If you refer to / use the same assets on a regular basis e.g. for Sales, subscribe to those assets so you'll be notified when changes are made to them.

When all workflows in your Campaign / Project are finished, make sure you archive the Campaign / Project to remove it from everyone's project list pages.

Use your Project homepage to see the approval summary to date for each workflow, including who has still to action each task.

Use the Parent / Child functionality where you have a series of assets with minor variations e.g. the same content is being sent to several local authorities, but needs different logos on each document. When checking out your Parent / master document, turn on the toggle to create Child docs (and state how many).

If you need the same group of reviewers on a regular basis, Save as Favourite – you can then select the group at the point of creating a new workflow, using Create from Favourite (this is classed as a personal favourite).

Hover over Projects in the left-hand navigation to see a list of your recently viewed Projects (stored in your cache).

Group workflows (at Campaign / Project level) from different Campaign / Projects by using the Group function and giving it a name of your choice e.g. "annual tax change". This helps to identify all assets being updated for the same reason.

Use Public link to select if the files in the record should be available publicly or not.

Set print parameters before uploading an excel document, so that the preview is created in a usable way.

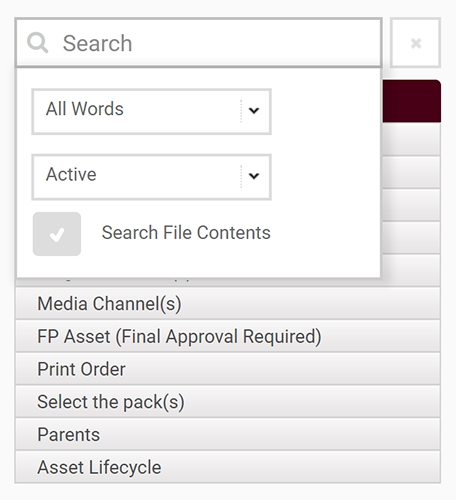
You can use the Search functionality in a variety of ways - all asset Metadata goes into the search engine, which enables you to search using different methods:

  • Use the filter options down the left hand side of the Asset Store to search on Asset Type, Asset Owner, Product, Channel, etc
  • Enter free text into the Search function e.g. if you know the asset name or code.
  • Search File Contents - this allows you to search through the Metadata and every word on every page of the PDF, Word doc, PowerPoint, etc. (file content) for active assets, with the option to select 'Search All Versions' and include previous versions of any asset. This can be a useful way of identifying assets impacted by a wider change e.g. regulatory / registered address / phone number, etc.
  • Drill down further on free text or file content searches, by choosing to search for:
  • Any Words
  • All Words
  • Phrase - this will search for what you’ve entered, with the search results including assets where there is Metadata content attached before or after what’s been searched on e.g. searching for 234 would also show results for 1234 and 2345.
  • Exact - shows the exact Metadata and / or content, that matches what’s been searched on.

CTRL + Y Shortcut to search for workflows that an asset is current checked out into (by asset code)

CTRL + / Shortcut to access a Project (by project number)

Click on the little information dots (Tooltips) that appear throughout the system, to guide you as to what information is required in the form fields.

popup showing help text

Include keywords in the asset Metadata to maximise identification opportunities within the Search functionality.

Re-order Search filters by dragging and dropping them where you want them to appear. This is then remembered in your cookies. TIP: move the filters you never use to the bottom of the list, and click on the header to close it - this will reduce the size of your open filter list.

Search filters can be expanded / collapsed by clicking on the header. This will be remembered in your cookie settings.

Do you have Favourites? Click on the star at the bottom of the thumbnail to mark these, so they appear as the first assets in the Asset Store for you – this will save you searching for them each time you need them.

CTRL + @ Shortcut to access a task in a workflow (by workflow ID)

CTRL + ; Shortcut to search the Asset Store (by asset code)

Explore bethebrand

If you would like to explore our system further, please:

or

Join our mailing list for latest bethebrand news:

Be The Brand Experience Limited, registered in England and Wales, Company number 04177329

Head Office: Unit 5 Culford House, 1-7 Orsman Road, London, N1 5RA
Copyright © 2024 Be The Brand Experience Limited.
Your privacy

By clicking “Accept all cookies”, you agree that bethebrand can store cookies on your device and disclose information in accordance with our Cookie Policy.